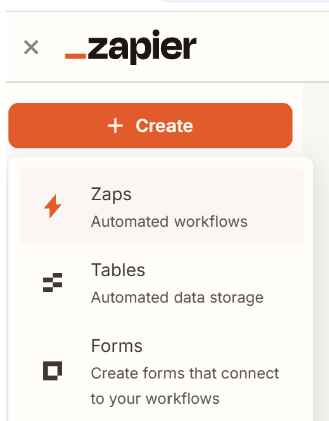
What is Zapier and Why Use It?
Zapier is a no-code automation platform that connects 6,000+ apps and allows them to work together seamlessly.
Instead of manually downloading files, uploading them for checking, and sending reports, Zapier lets you automate the entire process.
By connecting PlagiarismCheck.org to your existing tools, you can:
- Run plagiarism or AI checks without manual input
- Automatically check new submissions
- Send reports to teachers, editors, or managers instantly
- Store results in your CRM or database
- Create quality-control workflows
In short, Zapier integration saves time, reduces human error, and ensures every document is verified consistently.
How much does Zapier cost? Zapier pricing plans for professionals and teams vary from $19.99 to $69 per month. However, integration with PlagiarismCheck.org is available even at the free Zapier plan.
Setting Up Your First Automation
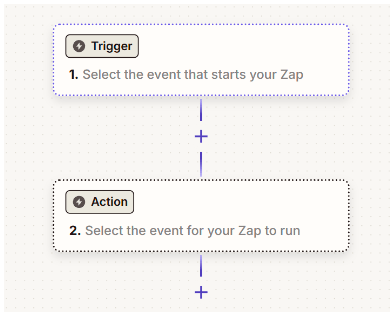
Step 1 — Create a New Zap
Open the Zapier official site. After inserting the Zapier login, click “Create Zap.”
What is “Zap” and how does Zapier work?
A “Zap” is an automated workflow consisting of:
- A Trigger (what starts the automation)
- One or more Actions (what happens next)
Example:
When a student submits a form → Automatically run a plagiarism check.
Step 2 — Choose a Trigger App
Your trigger app is where new content first appears.
Common examples:
- Google Forms (new submission)
- Learning Management Systems (assignment upload)
- Google Drive (new file in folder)
- Email (new attachment received)
- Notion or CMS (new draft created)
Choose the app your team already uses.
Step 3 — Select a Trigger Event
Each app has different trigger options. For example:
- “New Form Response”
- “New File in Folder”
- “New Email with Attachment”
- “New Database Record”
The trigger defines exactly what event should start the plagiarism or AI check.
Tip: Choose triggers that represent final submissions, not drafts, to avoid unnecessary checks.
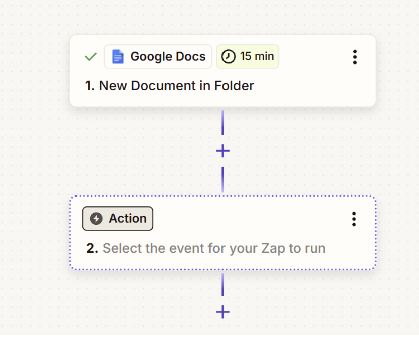
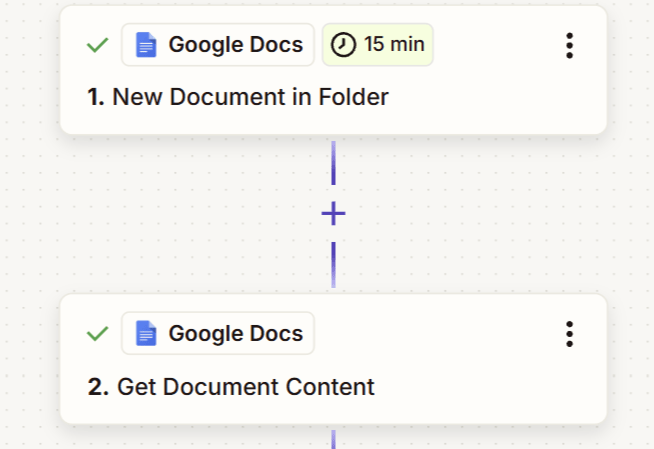
In our sample, we will trigger automation when a new Google Doc is created in a folder.
Step 4 — Connect Your Trigger App
Zapier will ask you to connect your account and test the trigger.
This ensures Zapier integrations can:
- Access new submissions
- Retrieve document content
- Pass the file or text to PlagiarismCheck.org
Always run the test to confirm data is being pulled correctly.
Step 5 — Export or Retrieve Document Content
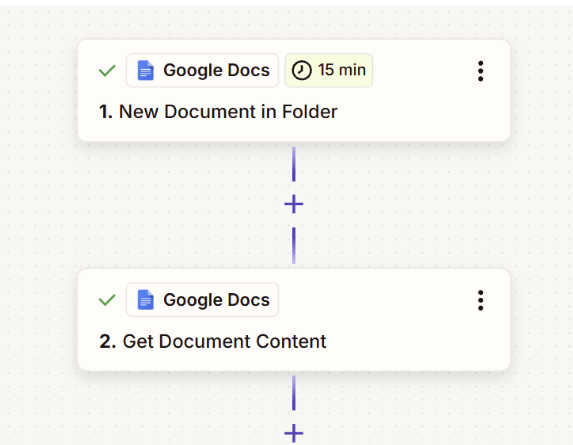
After triggering on a new Google Doc, add an action to retrieve the document’s text content (e.g., Google Docs → Get Document Content or Export Document as text/plain).
This step is essential because triggers only provide document metadata such as ID and title, not the actual text. By retrieving the content explicitly, Zapier pulls the full body of the document as plain text instead of a file reference.
Once retrieved, you can map the returned text/content field directly into the Document Content field in PlagiarismCheck.org — no additional formatting or conversion steps are required.
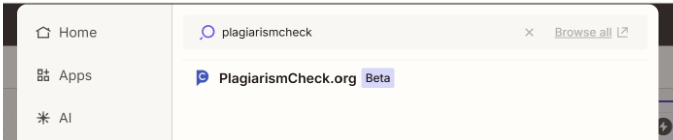
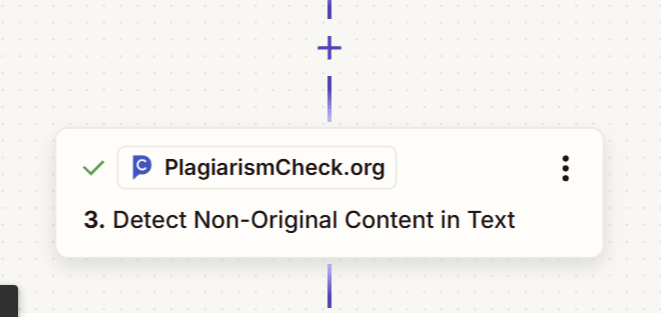
Step 6 — Add PlagiarismCheck.org as the Action App
Now, click “+ Add Action” and search for PlagiarismCheck.org.
Select it as your action app.
This means every time the trigger happens, the document will automatically be sent for checking.
Step 7 — Choose the Type of Check
Depending on your configuration, you may select:
- AI content detection
- Combined check (Plagiarism and AI)
Choose the option that matches your workflow requirements.
For academic institutions, combined checks are common.
For marketing teams, AI detection may be the priority.
Step 8 — Connect Your PlagiarismCheck.org Account
Zapier will prompt you to authenticate your account.
You may need:
- API key
- Account credentials
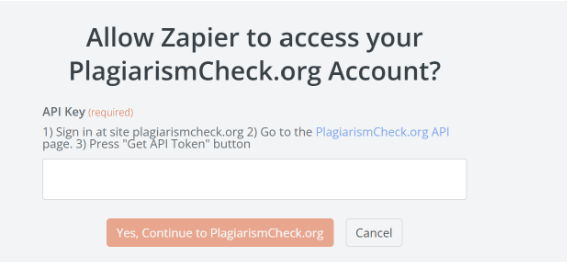
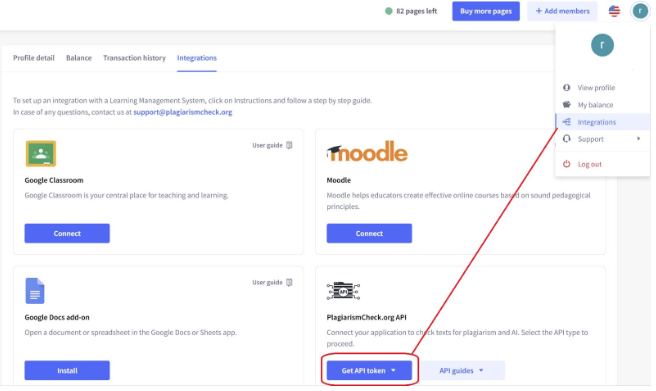
Once logged into your PlagiarismCheck.org account, you will find a personal API token on the Integrations page.
When connected, Zapier securely communicates with your PlagiarismCheck.org workspace.
Step 9 — Map the Document Fields
This is one of the most important steps.
You need to tell Zapier AI:
- Which field contains the document text
- Or which field contains the file URL or attachment
For example:
Map “Text Content” from Google Doc → Text field for originality check
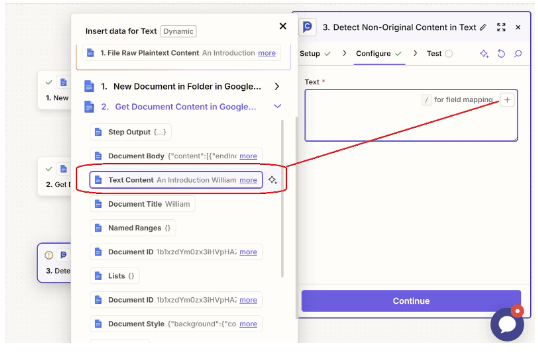
Correct mapping ensures accurate results.
Tip: If your documents are large, confirm the trigger app passes full content, not truncated previews.
Step 10 — (Optional) Add Filters or Conditions
To optimize credit usage, you can add filters such as:
- Only check documents over 300 words
- Only run check if status = “Final”
- Only notify the team if the similarity score > X%
This makes your automation smarter and more cost-efficient.
Step 11 — Test the Action
Run a test to confirm:
- The document is submitted successfully
- A report is generated
- Data flows correctly to the next step
Always review the output before activating the Zap.
Step 12 — Turn the Zap On
Once everything works correctly, turn the Zap ON.
From now on, the process runs automatically in the background.
No manual uploads. No missed checks.
Best Practices
- Run checks only on final versions
- Use filters to control credit usage
- Store reports automatically for auditing
- Start simple and scale gradually
- Monitor performance during the first week