
- Overview
- Account guides
- Blackboard
- Administrator’s guide – How to connect PlagiarismCheck with Blackboard LTI 1.3 (Dynamic Registration)
- Administrator’s guide – How to connect PlagiarismCheck with Blackboard LTI 1.3 (Manual Registration)
- Brightspace
- Canvas
- Google Classroom
- Moodle
- Schoology
Administrator’s guide – How to connect PlagiarismCheck with Blackboard LTI 1.3 (Manual Registration)
This guide walks Blackboard administrators through enabling the PlagiarismCheck.org LTI 1.3 integration using manual registration. Once enabled, instructors can attach PlagiarismCheck to any assignment, students submit their work directly inside Blackboard, and originality reports plus grades flow back automatically.
Before you start
You’ll need:
- Administrator access to your Blackboard Learn instance.
- A developer account at developer.blackboard.com — Anthology’s Developer Portal where every LTI 1.3 app for Blackboard is first registered.
- An active PlagiarismCheck.org organisation account with Admin (Owner) role. If you don’t have Admin access, but you need it, please contact us here.
- The registration page on plagiarismcheck.org open in another tab — you’ll use it to copy PlagiarismCheck’s endpoints and to submit the values Blackboard gives you back.
Note: LMS Blackboard integration is a two-stage process. First you register the app at developer.blackboard.com (the Anthology Developer Portal). Then you install that registered app inside your Blackboard Learn instance via LTI Tool Providers. Both stages are required.
Note: Use manual registration when your institution prefers to review each setting yourself, or if dynamic registration is blocked at your network edge. The flow has three parts: (1) register the application on developer.blackboard.com and copy out its credentials, (2) submit those credentials back into PlagiarismCheck, (3) install the tool inside your Blackboard Learn instance.
Step 1: Navigate to Integrations
- Login to PlagiarismCheck and follow Profile → Integrations or just click on this link https://plagiarismcheck.org/profile/integrations-list. On the list of integrations scroll until you see Blackboard.
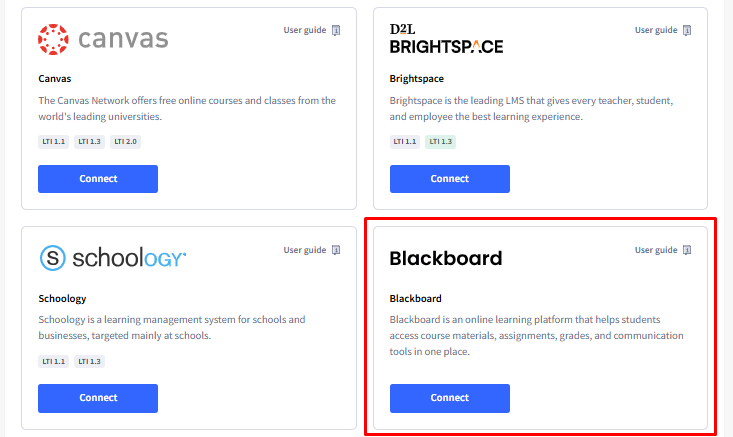
Step 2: Access your registration URLs
- On the PlagiarismCheck registration page, select Manual tab, scroll to Login initiation URL, Tool Redirect URL(s), Tool JWKS URL and then Copy.
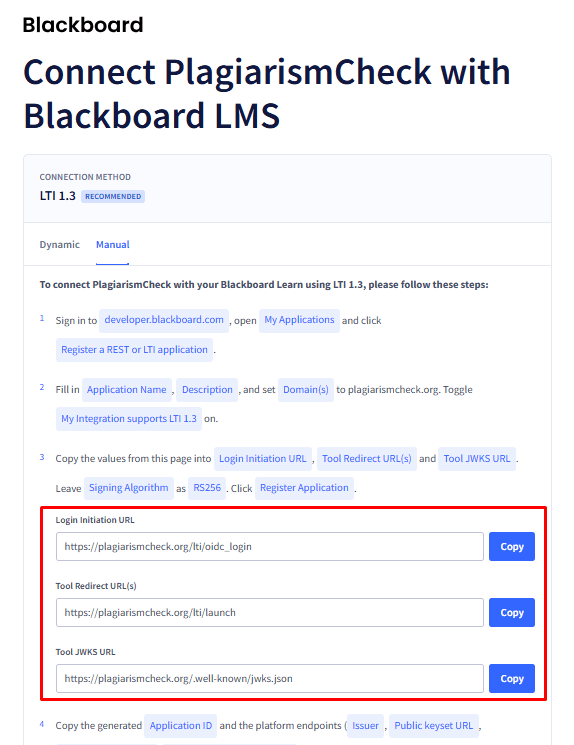
Step 3: Open the Anthology Developer Portal
- In a new tab, sign in at https://developer.blackboard.com/portal/applications. Click Register a REST or LTI application button.
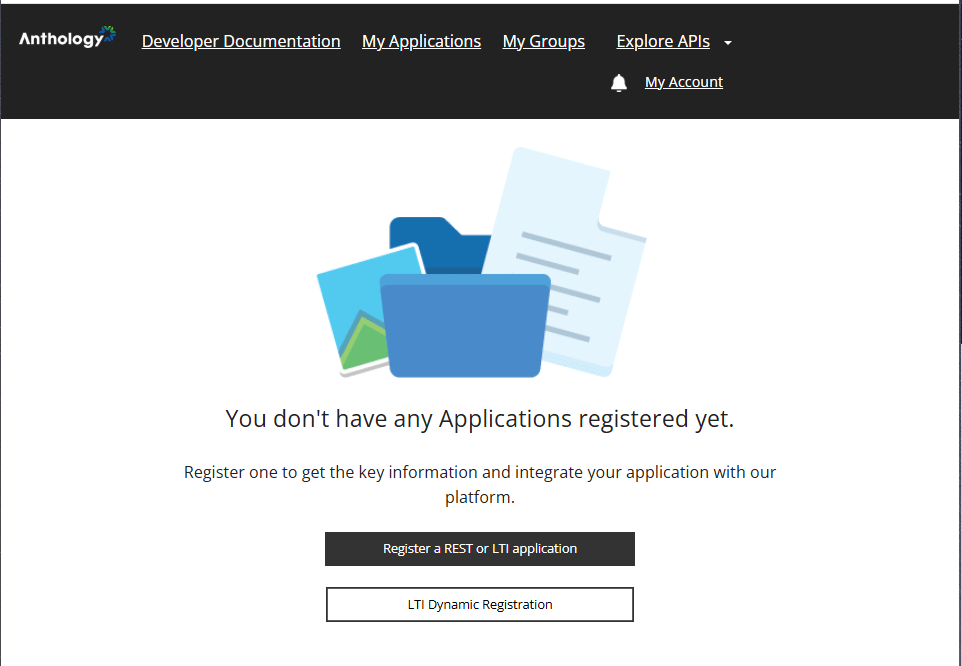
Step 4: Application basics
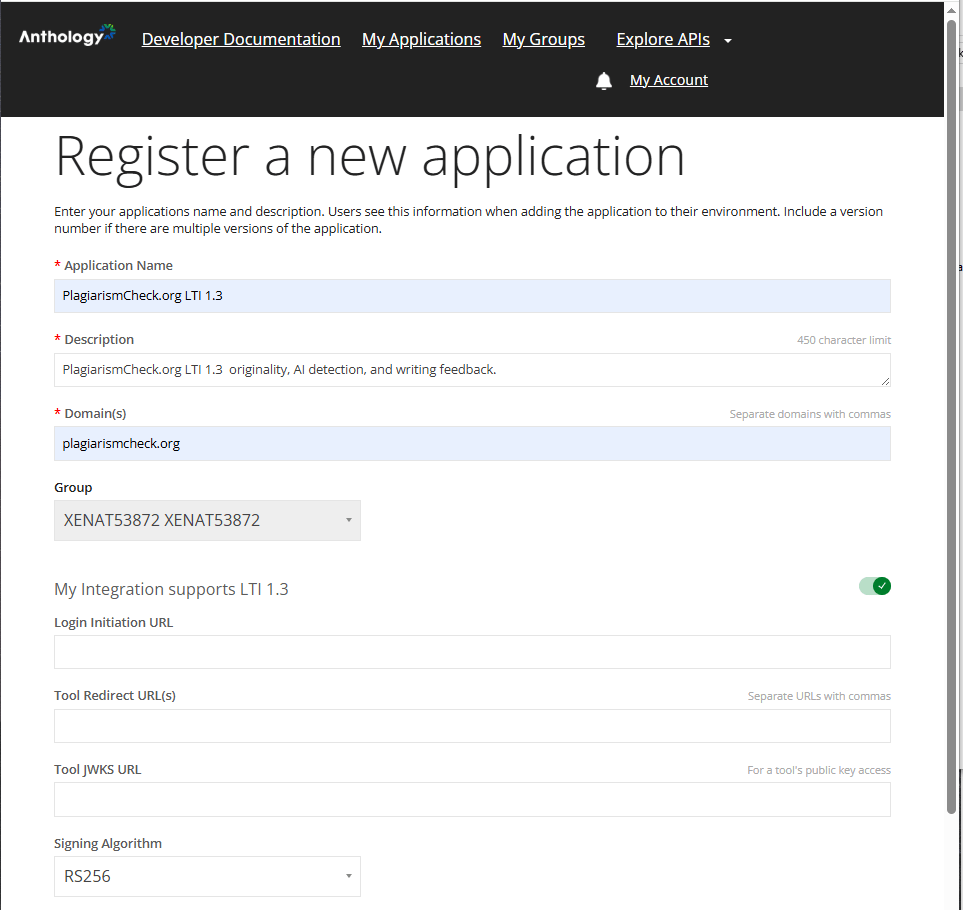
- On the Register a new application form, fill in the basic fields:
- Application Name — PlagiarismCheck.org LTI 1.3 (or any name that helps you identify it).
- Description — a short summary, e.g. PlagiarismCheck.org LTI 1.3 — originality, AI detection, and writing feedback.
- Domain(s) — plagiarismcheck.org. Multiple domains can be separated with commas; for PlagiarismCheck only this single value is needed.
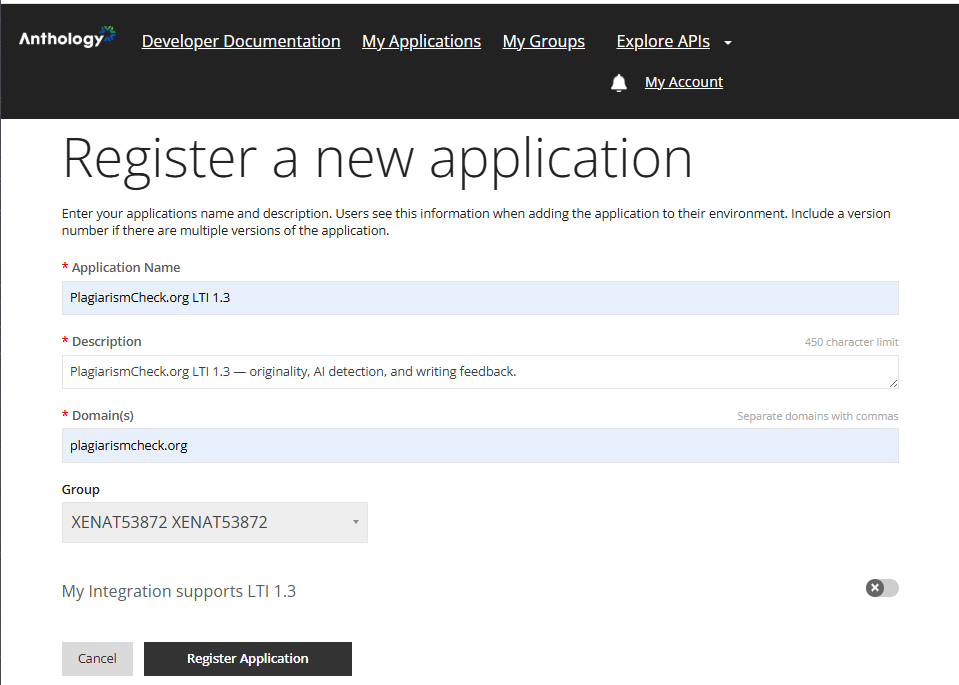
Step 5: Enable LTI 1.3
- Toggle My Integration supports LTI 1.3 on. Four additional fields appear: Login Initiation URL, Tool Redirect URL(s), Tool JWKS URL, and Signing Algorithm.
Step 6: Paste PlagiarismCheck’s endpoints
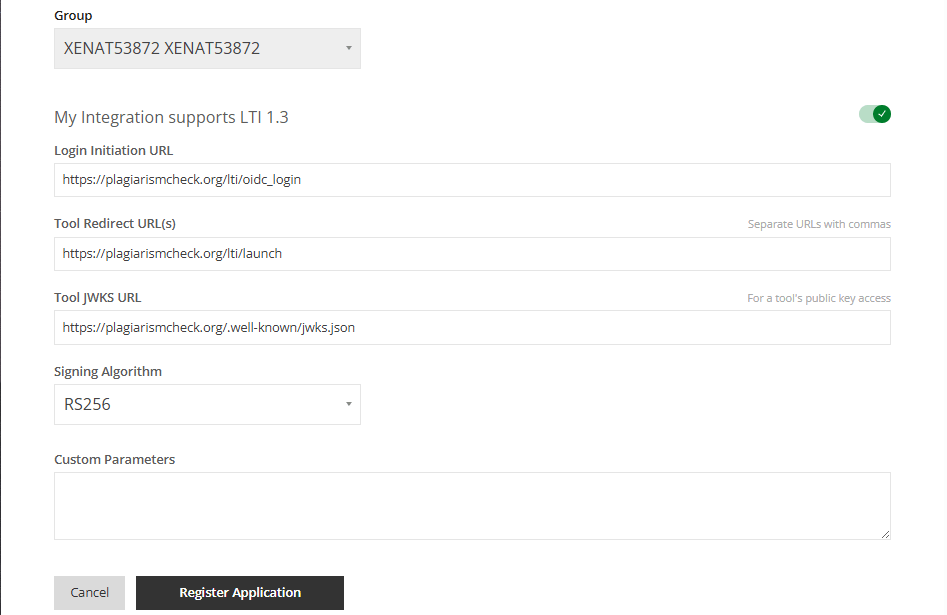
- Copy the values from the PlagiarismCheck registration page (Step 2 of this guide) into the matching Blackboard fields:
- Login Initiation URL — copy the value provided.
- Tool Redirect URL(s) — copy the launch URL.
- Tool JWKS URL — copy the JWKS URL.
- Signing Algorithm — leave as RS256 .
- Custom Parameters — leave empty; default substitution parameters are added automatically when you connect the tool to Blackboard Learn in Step 9.
Click Register Application at the bottom.
Step 7: Copy your application’s credentials
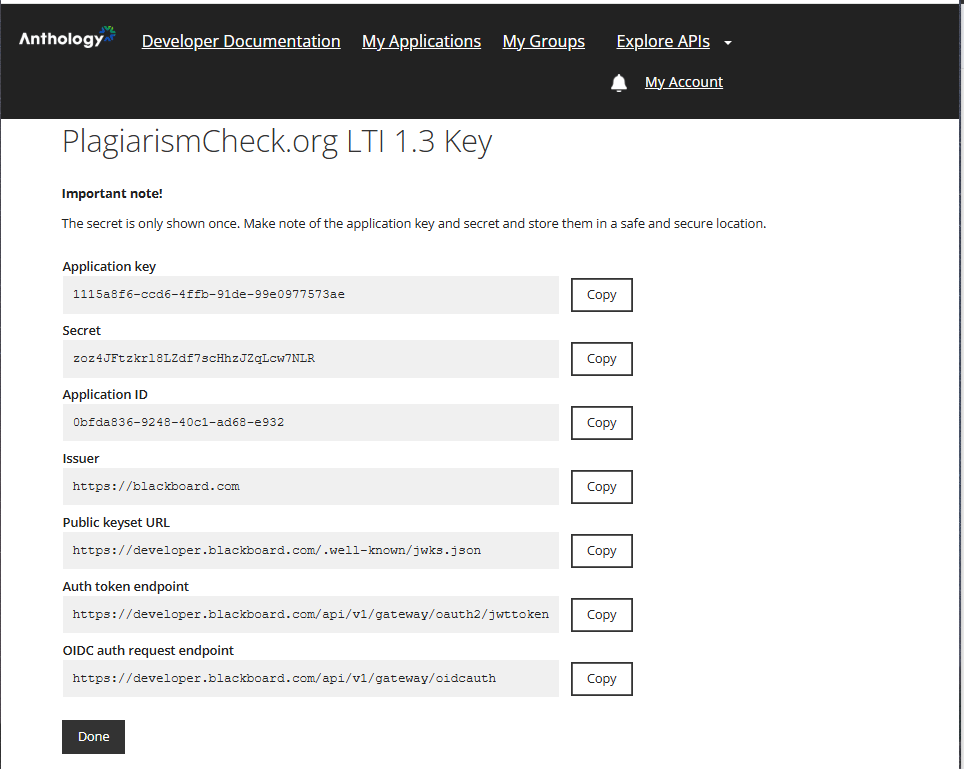
- Blackboard generates the application and shows a Key page with everything PlagiarismCheck needs to authenticate. Note: The Secret is shown only once. Copy it now — if you leave the page without copying, you’ll have to regenerate it.
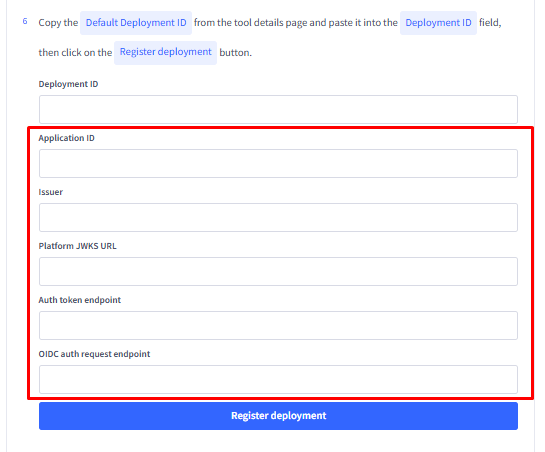
Copy each of these values into the matching field on the PlagiarismCheck manual registration page:
- Application key
- Secret
- Application ID (this is the value Blackboard Learn calls Client ID)
- Issuer — usually https://blackboard.com.
- Public keyset URL
- Auth token endpoint
- OIDC auth request endpoint
Step 8: Register the LTI 1.3/Advantage Tool in Blackboard Learn
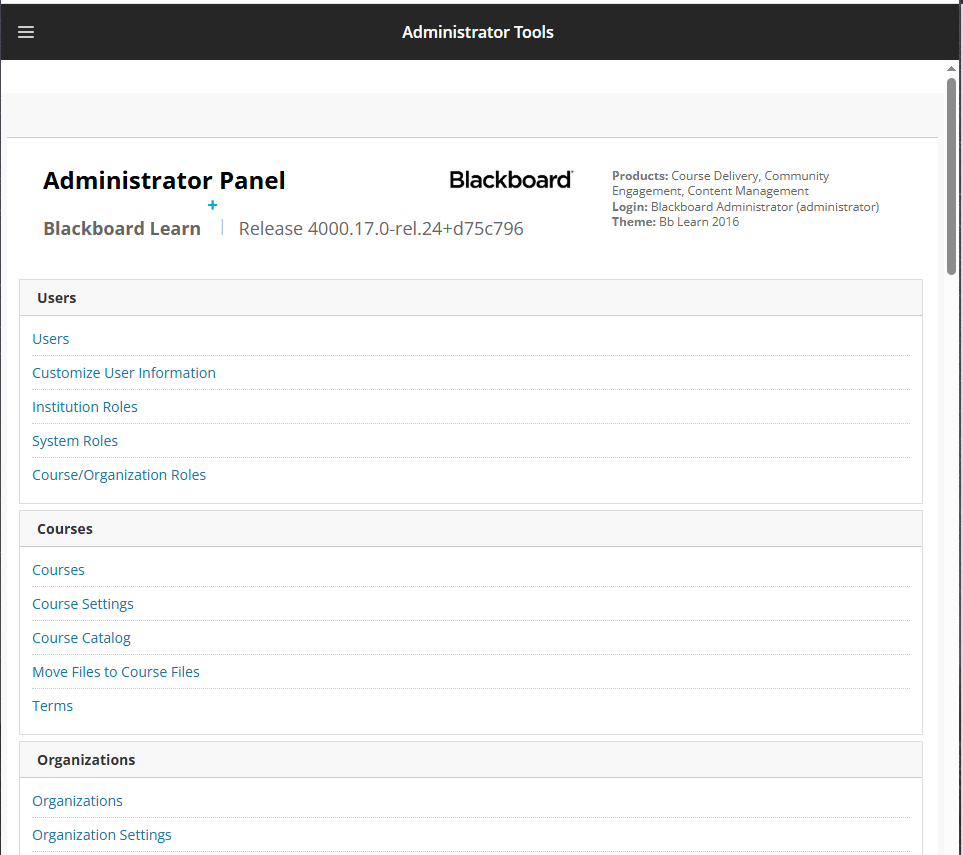
- Switch to your actual Blackboard Learn instance (your institution’s Blackboard URL, not developer.blackboard.com). Sign in as a system administrator. Open Administrator Panel → Integrations → LTI Tool Providers, then click Register LTI 1.3/Advantage Tool.
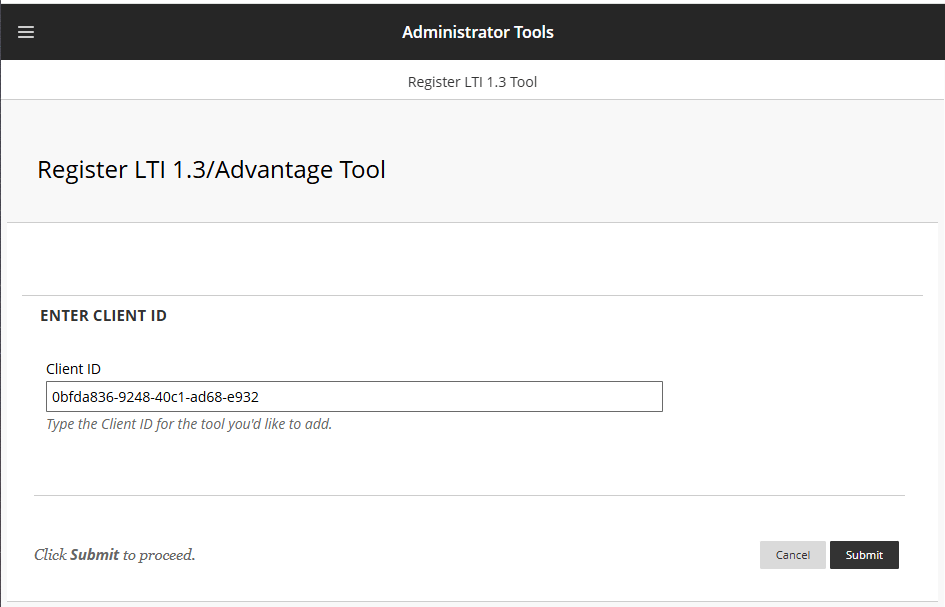
- Blackboard asks for a single Client ID. Paste the Application ID you copied in Step 7 and click Submit. Blackboard fetches the tool’s configuration from developer.blackboard.com and pre-fills the rest of the form.
Step 9: Approve the tool
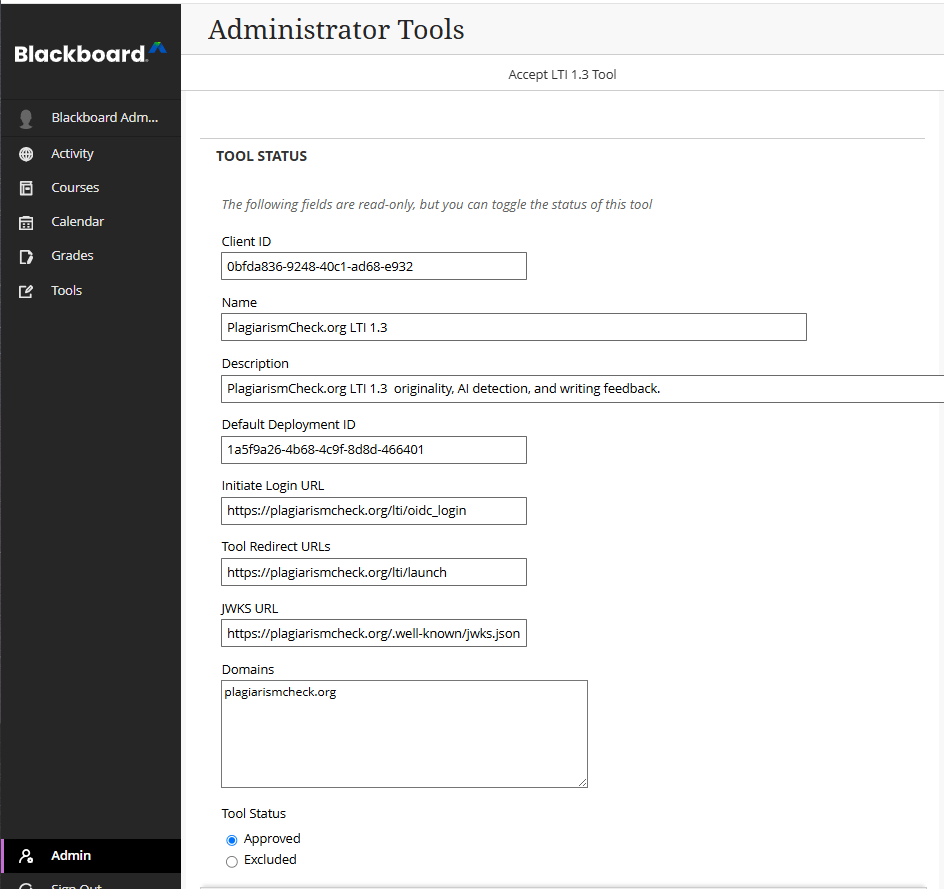
- On the tool details page, all the URL fields are pre-filled and read-only. Switch Tool Status from Excluded to Approved.
Step 10: Configure Institution Policies
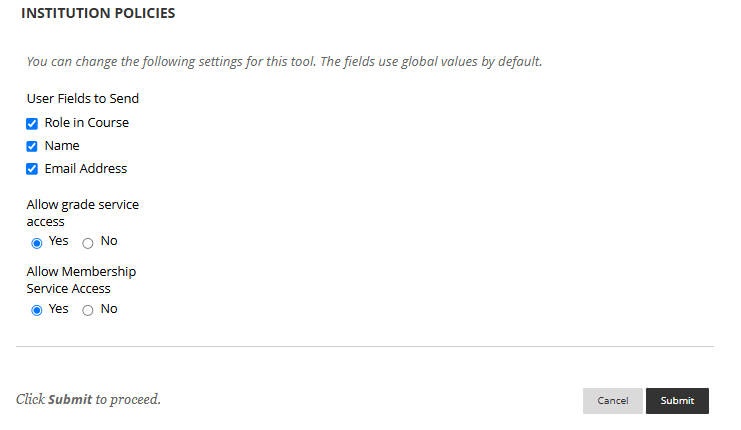
- Scroll down to Institution Policies . These control what user data Blackboard shares with PlagiarismCheck and whether the tool can write back to the gradebook. Set them as follows:
- User Fields to Send — tick Role in Course, Name and Email Address. PlagiarismCheck needs these to attribute originality reports to the correct student.
- Allow grade service access — Yes. Required so PlagiarismCheck can post similarity scores and grades back to the gradebook.
- Allow Membership Service Access — Yes. Required so PlagiarismCheck can read the course roster.
- Show User Acknowledgement Message — leave as No unless your institution requires it.
- Click Submit at the bottom.
Step 11: Confirm
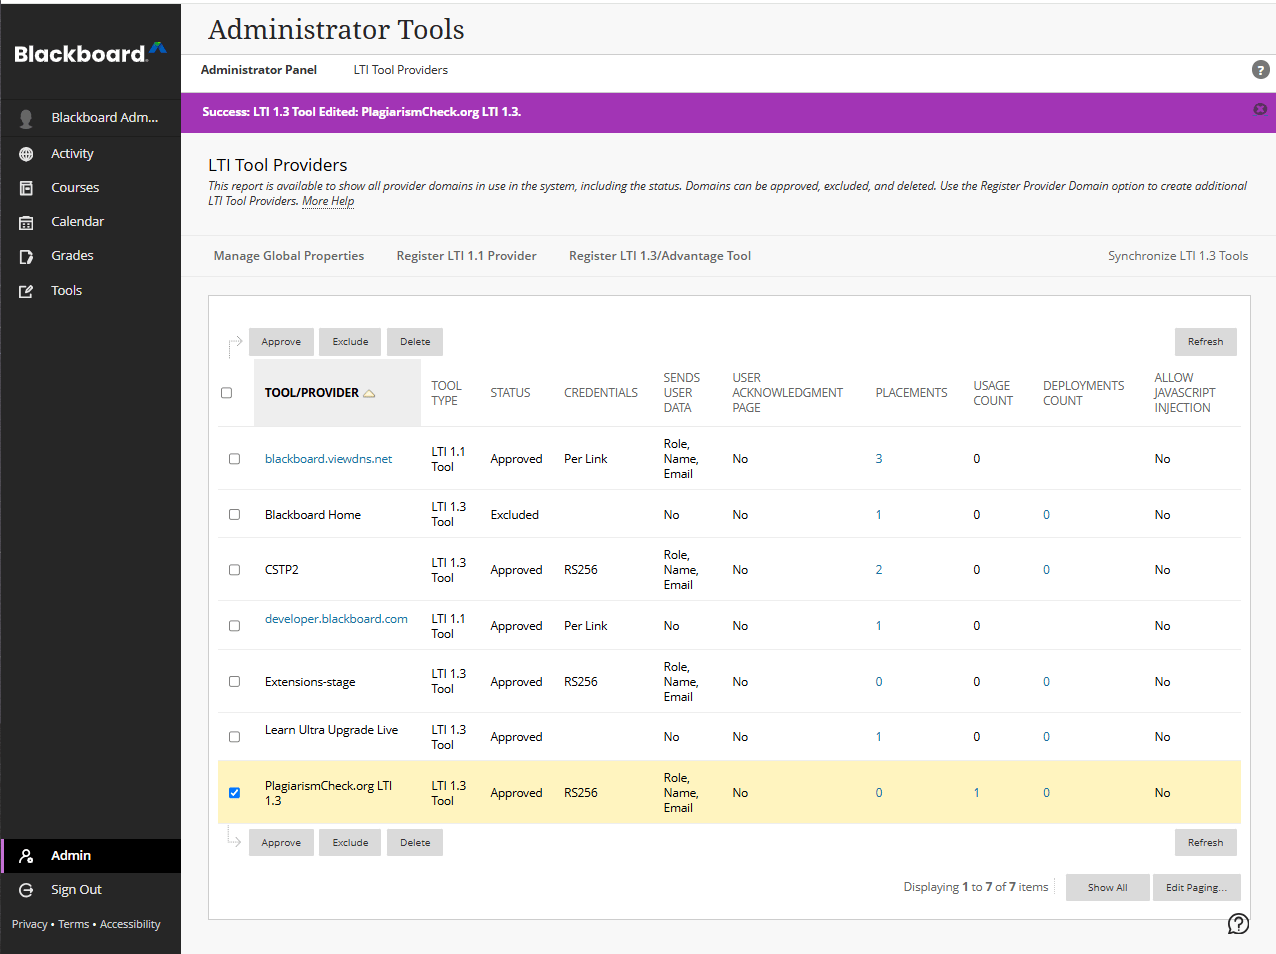
- Blackboard returns to the tool list with a success banner. The PlagiarismCheck.org LTI 1.3 row should show Approved, credentials RS256, and Role, Name, Email under user data.
Step 12: Submit the registration on PlagiarismCheck
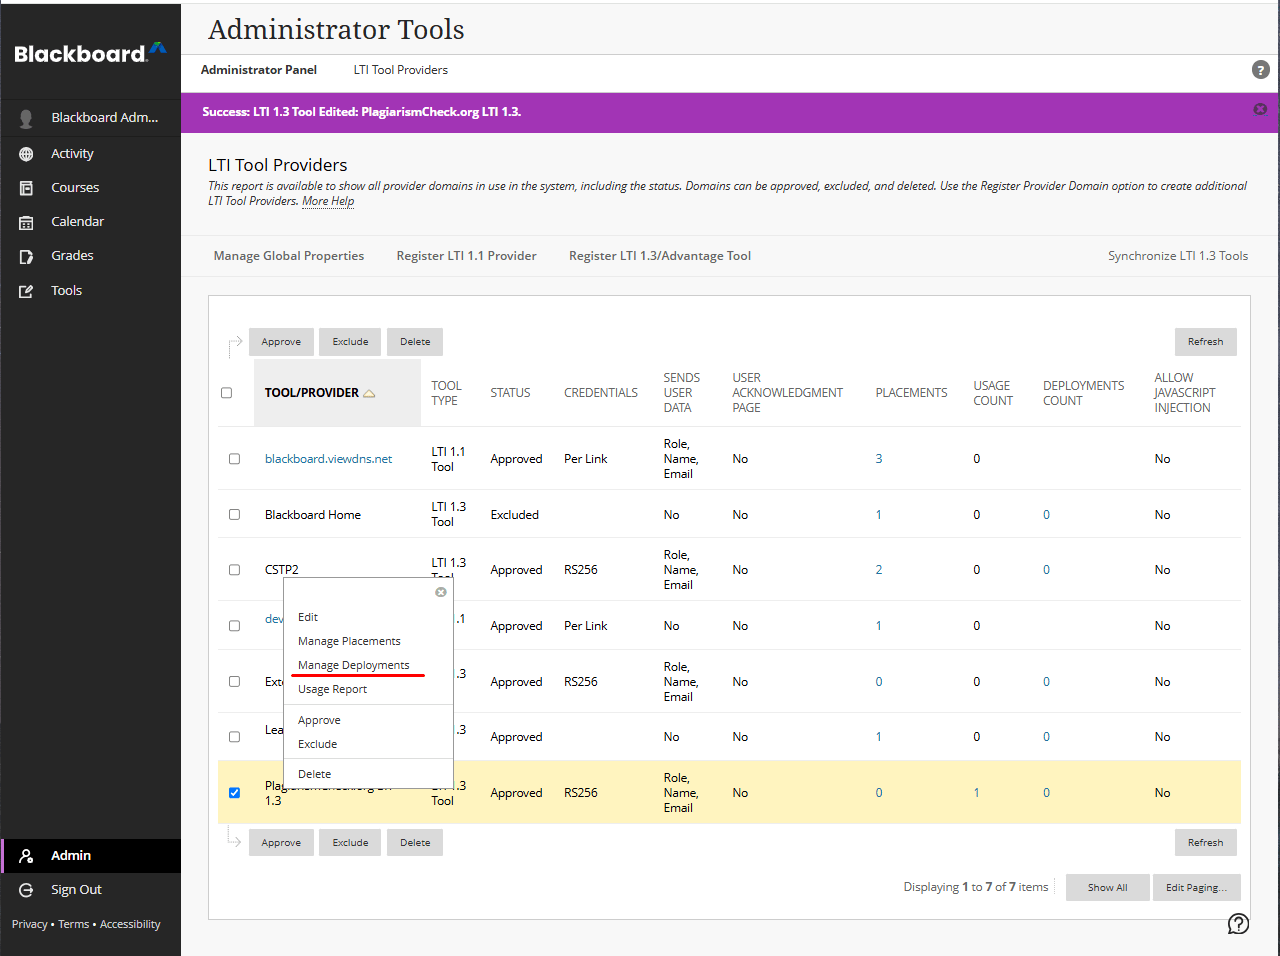
- The Default Deployment ID is required to register the deployment on plagiarismcheck.org.Open the drop-down menu next to the PlagiarismCheck.org LTI 1.3 tool you created. Select the Manage Deployments option.
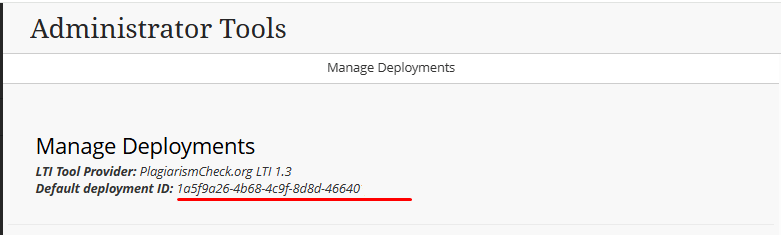
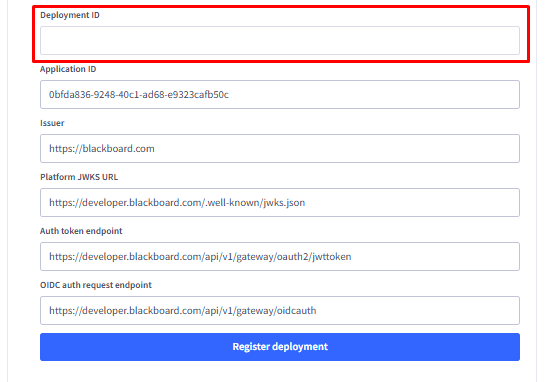
- Copy the Default deployment ID and paste it into the Deployment ID field on the registration page (Step 7), then click on the Register deployment button .
- Now your integration with Blackboard is completed.
Testing the integration
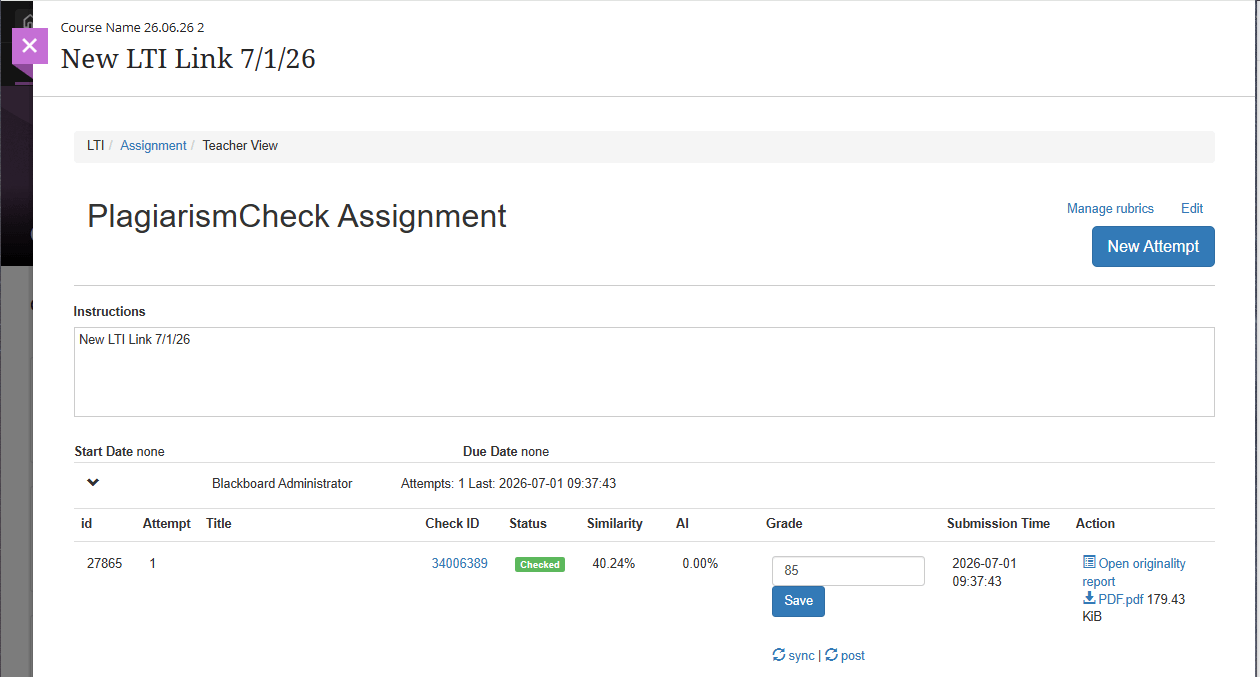
After registration, open a test course as an instructor and add the tool as content. Submit a short sample document as a student, return as the instructor, and confirm the originality report opens and the grade syncs back to the gradebook.
Troubleshooting
Tool registered in My Applications but not visible in Blackboard Learn
Registering the app at developer.blackboard.com only adds it to the Anthology Developer Portal. To make it usable inside your Blackboard Learn instance you also need to register the LTI 1.3/Advantage Tool in your Learn admin (Step 5 onwards). Without this, instructors won’t see the tool in their courses.
‘Bad Request’ or ‘Invalid Client ID’ when registering in Learn
Double-check that you pasted the full Application ID from My Applications, not the Application Key or Secret. The Application ID is a UUID-style value like 3191b46b-4a98-4357-9e1c-9299a2e014df.
Originality reports don’t appear in the gradebook
Confirm that Allow grade service access and Allow Membership Service Access are both set to Yes on the tool’s Institution Policies section. If you changed these after the first launch, ask the instructor to re-create the assignment.
Students see an error when launching the tool
Ask the student to clear cookies for your Blackboard domain and retry. If the error persists, copy the error code from the launch screen and contact support@plagiarismcheck.org.
Need help?
Email support@plagiarismcheck.org — please include your institution name, your Blackboard Learn release/version, and a screenshot of any error you see.